
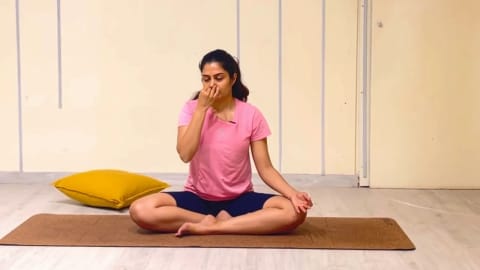
Of all the classical breathing practices, alternate-nostril breathing may be the one people return to most. It is quiet, it can be done almost anywhere you can sit, and its rhythm gives the mind something steady to follow.
What the name means
Anuloma means "with the grain" and viloma "against the grain". In practice, the breath flows in through one nostril and out through the other, then reverses. The practice is also widely known as nāḍī śodhana, "cleansing of the channels", after the yogic idea of nāḍīs, the subtle channels through which prāṇa (vital energy) is said to flow. Some teachers reserve that name for versions that include breath retention.
Jagdish Bramta's pranayama session on the Jiva Balance channel describes anuloma viloma as regulating and balancing the flow of prana through the nadis, often used for purification, harmonisation and mental steadiness. On the Tatwika channel, Day 7 of the 7 Day Beginner Yoga series closes a slow yin practice with anuloma viloma, which is a lovely context for it: a calm body makes the breath easier to refine.
The hand position
Most traditions use the right hand in Viṣṇu mudrā:
- Fold the index and middle fingers into the palm.
- The thumb closes the right nostril.
- The ring finger (with the little finger resting beside it) closes the left nostril.
Rest the left hand on the left knee, palm up or down. Keep the right elbow relaxed and close to the body; propping it on a cushion helps if the arm tires.
An alternative some people find easier is to rest the index and middle fingers lightly on the forehead between the eyebrows.
Step by step
Preparation
- Sit comfortably with an upright spine, on a cushion or chair.
- Close the eyes. Take a few natural breaths through both nostrils.
- Bring the right hand into position.
One round
- Close the right nostril with the thumb. Breathe in slowly through the left.
- Close the left nostril with the ring finger, release the thumb. Breathe out through the right.
- Breathe in through the right.
- Close the right, release the left. Breathe out through the left.
That is one round. Begin with five to ten rounds, then lower the hand and breathe naturally for a minute.
Rhythm
At first, simply make in-breath and out-breath smooth and roughly equal. When that feels easy, many teachers suggest letting the out-breath become slightly longer than the in-breath, for example breathing in for a count of four and out for a count of six. Never strain for a count.
Common mistakes
- Pressing too hard. A light touch is enough to close the nostril. Pressing hard pushes the nose sideways and creates tension.
- Breathing too forcefully. The breath should be almost silent. If you can hear it loudly, soften.
- Rushing. Speed defeats the purpose. Slow is the practice.
- Collapsing posture. Check that the spine is still upright and the shoulders soft as the rounds go on.
- Adding breath retention too early. Holding the breath (kumbhaka) is an advanced variation best learned from a teacher.
When to practise
- Before meditation, to settle the mind.
- In the evening, as part of a wind-down routine.
- In a pause during the day, even three rounds at a desk can be refreshing.
Practise on an empty stomach where possible and in a well-ventilated space.
What people commonly notice
Practitioners often describe alternate-nostril breathing as calming and balancing, and many find it easier to sit for meditation afterwards. These are personal experiences, not medical claims, and the main value lies in regular, gentle practice.
Building the practice over weeks
A gentle progression many teachers suggest:
- Week 1–2: five to ten rounds with an even, comfortable rhythm. Focus on a light touch and a smooth breath.
- Week 3–4: extend to about five minutes. Let the out-breath lengthen slightly.
- Later: practise for up to ten minutes before meditation, if it remains comfortable.
Some traditions eventually add ratios with breath retention, such as counts for inhaling, holding and exhaling. These are best learned with an experienced teacher who knows your health and practice.
Making it part of the day
Alternate-nostril breathing combines easily with other habits. Try three rounds before opening your laptop in the morning, or five rounds after a stressful call. In the evening, a few minutes before bed can become part of a wind-down routine, especially after gentle stretching or a supported yin pose like the ones Tatwika uses on Day 7.
Safety notes
Anuloma viloma without retention is gentle and suitable for most people. Still:
- Stop if you feel dizzy, light-headed or anxious, and breathe normally.
- If you are pregnant, or have high blood pressure, a heart condition or a respiratory condition, avoid breath retention and consult a qualified professional before adding any intensity.
- Do not practise with a blocked nose; choose simple breath awareness instead.
A short practice for today
- Sit and settle for one minute.
- Five rounds of anuloma viloma, smooth and equal.
- Five more rounds with the out-breath slightly longer.
- One minute of natural breathing with eyes closed.
Seven minutes in total. Simple, and surprisingly complete.
Practise along
Follow Tatwika's Yin Yoga for relaxation | Anuloma Viloma Pranayama on Platonix to experience the practice after gentle yin poses, or watch Jagdish Bramta's session on the Jiva Balance channel to see it alongside other classical pranayamas.